Monday, April 26, 2010

Unity Anniversary Challenge #1

This week is Unity's 2nd Anniversary and they have lots of fun stuff planned.  Today they issued a challenge using this sketch:
You have to use ribbon and at least 3 buttons on your card, along with Unity stamps. 

Here's what I came up with.  I've had this daisy set for a while and had never inked it up.  But they were the first thing I thought of when I saw this sketch. 


The stamps are all Unity...Crazy for Daisies and the March Kit of the Month.  The patterned paper is by K & Company, the cardstock is by Papetrey Ink.  The green ribbon and the buttons were just pulled from my stash.  I also used Memento Rich Cocoa ink and Spellbinders dies. 

Thanks for stopping by, and as always, your comments are very much appreciated.

Lauren

Sunday, April 25, 2010

Papertrey Ink Blog Hop Challenge: Tissue Paper


When I read that this month's challenge was tissue paper, the first idea that came to my mind was to "upholster" the couch and chair from On My Couch.  So that's what I did. 


I added various decorative accents from On My Couch, On My Couch Additions and Chair-ished.   The paper is Green Tea Leaves and Rustic White cardstock, all by Papetrey. 


The couch, chair, rug, and pillows are all made from tissue paper applied to cardstock using Modge Podge.  I also added another layer of Modge Podge over the tissue paper to give the furniture a "leather" look.  Kinda fun how that works.  The couch and chair are cut from matching dies. 


I was lucky enough to have colored tissue paper in my gift wrap stash that matched the colors in the patterned paper.  The sentiment is stamped on a Spellbinders die label.  I also have a gold gel pen that I used to accent the picture frame and lamp to add a little more detail.  The "wood floor" is stamped on Cosmo Cricket woodgrain patterned paper.  You can see the detail much better in person.  The floor stamp is from Papertrey's Chair-ished set. 


Finally, I scored a strip of cardstock and adhered to the top of the card to make it look like crown molding.  I also should have added a small strip as a baseboard, but I didn't think of it until the card was assembled. Oh well. 

Hope you enjoyed looking!!!  Thanks for stopping by and, as always, your comments are very much appreciated! 

Lauren

Saturday, April 24, 2010

Another Mother's Day Card

I am blessed to have many "mama's" in my life, which means this time each year I'm a busy little bee making special cards for each of these special ladies.  My great-grandmother is even still living...which means my family has 5 generations.  That has made for a priceless photograph. 

Anyway, here is another Mother's Day card I made today with a new Hero Arts cling stamp set I recently bought.  The background is stamped randomly with stamps from the set, while the center flower is colored with Prismas and cut out.  I layered the flower over a Papertrey Ink die and matching frame stamp.  The center flower is also adhered with pop dots to give it more dimension, but it's hard to tell in the photos.  I used a marker to color the center dots of some of the background flowers to add a little more detail. 


Of course I can't tell you who's getting what card, but check back as I will be likely be posting a couple more Mother's Day cards before I start moving into my Father's Day list.

Thanks for looking, and as always, I appreciate your comments.  Enjoy your day!!

Lauren

Wednesday, April 21, 2010

Papertrey Chicks: First Challenge


The Papertrey Chicks has issued it's first challenge: Argyle, Hibiscus Burst, Spring Rain and Smokey Shadow.  Since I don't have Hibiscus Burst or Spring Rain ink (yet), I had to improvise with some Memento colors (Rosebud and Summer Sky.)


The argyle pattern was made from Papertrey's new argyle background stamp set.  It's an amazing set that lets you create your own argyle pattern in three different sizes.  The leaf stamp and sentiment are from Papertrey's Blooming Button Bits set.  The center die cut shape is Nestabilities, and is cut out of Papertrey's Rustic White cardstock.  Since this is a 4x6 card, I had to cut down a piece of 12x12 cardstock.  The card base is Bazzill, as is the ribbon.  I added a couple of buttons from my stash tied with twine to complete the card. 

Thanks for looking and all of your comments are very much appreciated!!  Your thoughtful words truly make my day!!!

Lauren


Thursday, April 15, 2010

Personal Challenge #4: One woman's trash...

I'm a paper snob.  I buy the good stuff.  Now don't get me wrong,  I certainly have more than my share of cheap paper packs that I do use.  But there's something about those boutique-y companies that draws me in.  So, with that comes a fabulous stash of scraps.  I just don't have the heart to throw them out, so they collect and collect and collect.

Today I made 2 cards made solely from scraps.  I didn't cut into a single sheet of fresh paper. 


This first one was made from Papertrey Spring Moss cardstock and My Mind's Eye patterned paper.
 

The focal point background (the reverse polka dots) is stamped with a Saavy Stamp in Colorbox Creamy Brown onto Spring Moss cardstock and adhered with pop dots. This ink is a perfect match to kraft cardstock. The cupcake is punched with a Martha Stewart punch.  I added a little glitter glue to the "frosting" on the cupcake to make it sparkle a bit.


All the edges are also inked with Creamy Brown. Not sure who makes the ribbon. The sentiment is a My Favorite Things stamp, stamped on Spellbinders label.


The second card was made from Papertrey Ink Rustic Cream cardstock.  Does anyone still have the plastic box of pre-punched squares that you could buy at the craft stores?  They come in a variety of colors and are about 1.5 inches big.  Well, that's what these squares are.  I was going through a drawer yesterday and came across the container of squares and thought 'what the heck am I going to use this for?'  I bought them before I realized the value of a square punch and haven't touched them since getting the punch.  But today I used them as the mat for the punched umbrellas. 


The umbrellas are punched from scraps with a Martha Stewart punch.  The sentiment is by A Muse.  The twine and button are Papertrey.  I think the ribbon is American Crafts. 


 It feels good making a few things from what was otherwise garbage.  Thanks for looking and enjoy your day!!

Lauren

Tuesday, April 13, 2010

Birthday Wishes

This card is a perfect example of the other side of my personality.  As you can tell from my blog so far, I really like the clean & simple look of lots of white space.  The flip side of that is my love of a shabby-chic feel.  I also call it "vintage country".  Not too frilly and frou frou, but just enough girliness to make me forget that I live in a house full of boys.  Big and small.  Well, at least until I hear the yells of the WWF Smackdown going on in our living room.  Usually my 10-month-old prevails.  He shows no mercy.  But I digress. 

When I saw that the tabs from the Papertrey scrapbook stamp set fit perfectly in the humps of their large scallop die, I couldn't wait to make a card.  This really does expand the versatility of this stamp set, which was impossible to resist to begin with.  Overall, this card is still fairly simple, but it has a few more details than my typical project. 


The card base is Papertrey Rustic Cream cardstock.  (Have I mentioned how much I love this paper?) All the stamps and buttons are also Papertrey Ink. (Have I mentioned how much I love this company?)  The patterned paper is by My Mind's Eye. (Love them too!) The yellowish green solid paper is the reverse side of the floral print.  The inks are Memento Rich Cocoa, Versamark and Papertrey Vintage Chai and Chamomile.  I added a little crocheted lace to finish off the vintage feel of this card.  I really liked how the design from this tab stamp matched the loop at the top of the frame stamp.  The frame die and scallop border die are also by Papertrey.

I know exactly who will be getting this card. ;)  Thanks for looking and enjoy your day!! I need to go rescue my almost 4-year-old from the death grip his little brother has on him.  Ah, the joys of boys... ;)

Lauren

Monday, April 12, 2010

Personal Challenge #3: Quick & Easy Gift Set

I'm always looking for a last minute gift.  No matter how good I try to be about birthdays and other occasions, it never fails that I fail.  So, I wanted to come up with a set of cards that I could make lickity split for those (all too often) times that I forget to go shopping.  This set of 6 cards is what I came up with. 

It took me LESS THAN AN HOUR to make all 6!  Not bad, huh?  And oh so easy!!


They are all made on  Papertrey Ink Rustic Cream cardstock.  I LOVE this stuff!!  I recently bought some and it's fantastic.  It has just enough texture to add richness while still being able to stamp beautifully on it.  Like Kraft cardstock.  And it's SO much prettier in person than in photographs.  The flower and branch stamps are from a super cute Martha Stewart set I got at Michael's for $9 with a 50% off coupon.  It came with a large sheet of flowers, stems, leaves, branches, flower pots, etc...plus 4 pigment ink pads.  All of the sentiments are from the Everyday Button Bits and Blooming Button Bits by Papertrey. 


This first one I made with the pads that came in the set.  Two shades of pink and brown.  (The darker pink also matches Papertrey Berry Sorbet cardstock perfectly...yay!!)


The turquoise one is made from Papertrey Ink Hawaiian Shores ink as well as Memento Rich Cocoa. (Love love love this color!!!!)


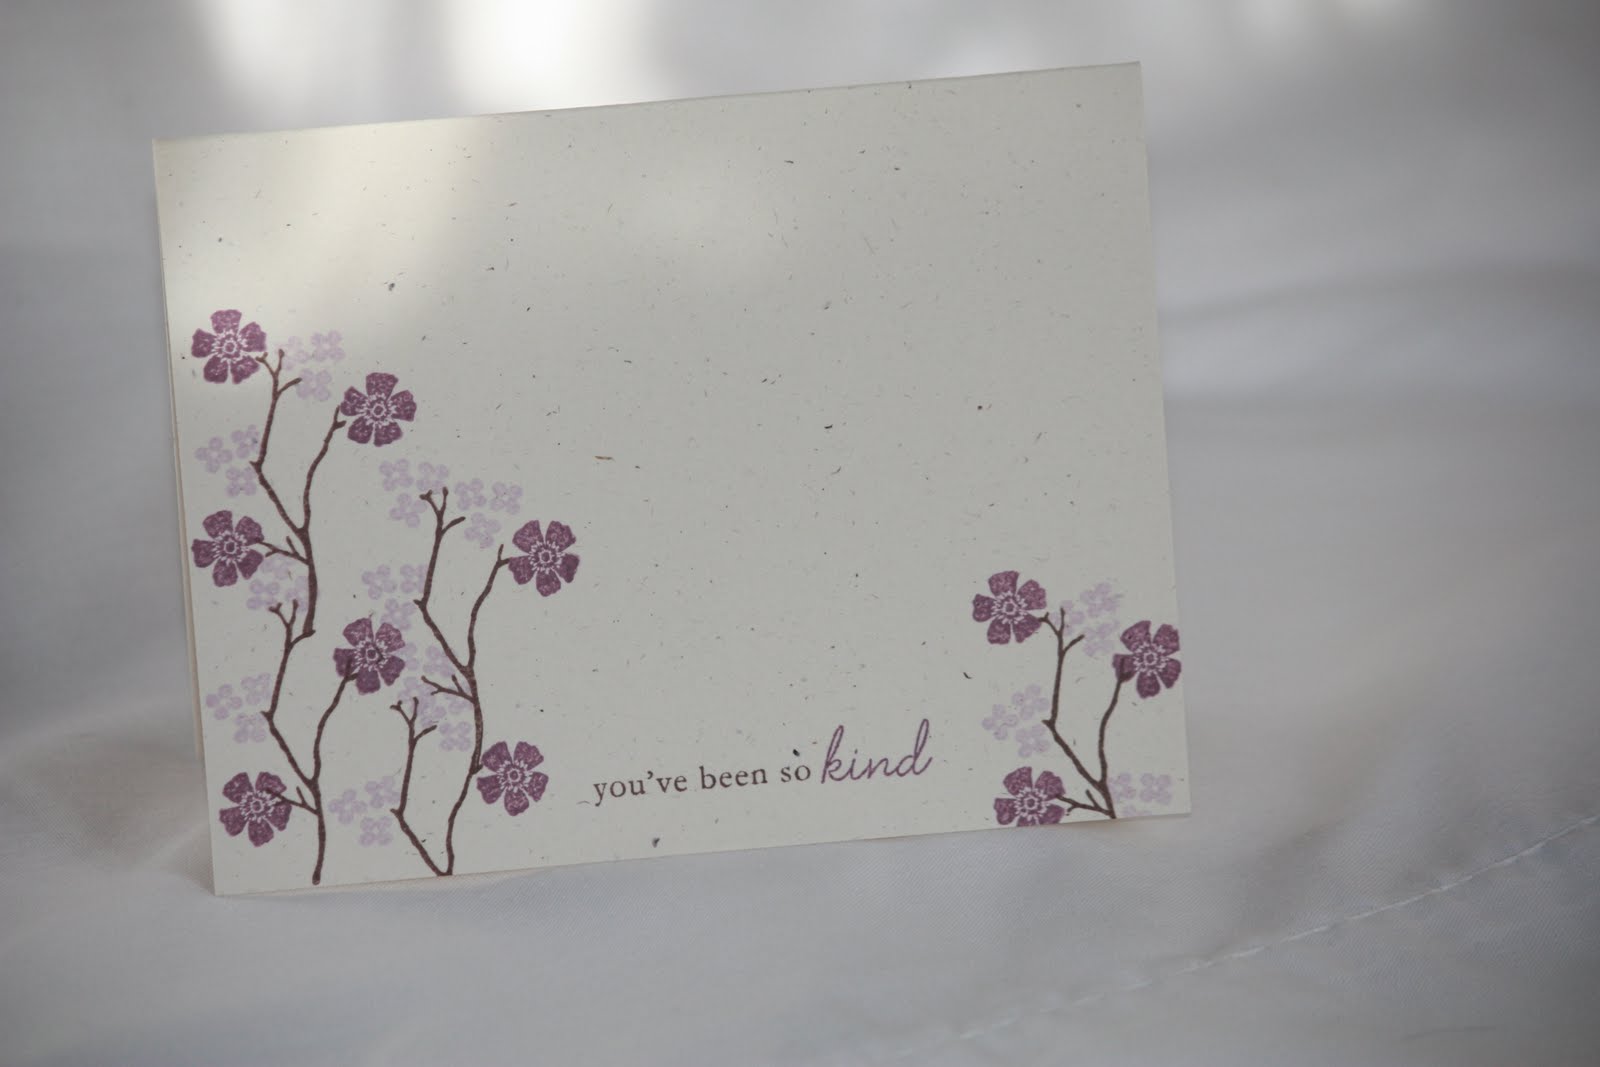
The purple card is made with Memento Sweet Plum, Lulu Lavender and Rich Cocoa.


The orange card is made with Memento Tangelo, Cantaloupe and Rich Cocoa.


The blue one is made with Memento Danube Blue, Summer Sky and Rich Cocoa.


The green card is made with Memento Bamboo Leaves, New Sprout and Rich Cocoa.


I will probably tie them up with twine and put them in a clear Papertrey box along with the coordinating envelopes.  Although I haven't done it yet, decorating the envelopes with a couple of matching branches and flowers would be really cute and tie it all together.  I think my favorite part about this project is that I can whip up several sets in an afternoon to have on hand. 

Thanks for looking!!  Hope you all have a great day.  And go get yourself some of this Papertrey Rustic Cream cardstock...you will thank me later. 

Lauren

Sunday, April 11, 2010

A little sunshine

Today I'm posting a card I made with my new Hero Arts clouds stamp and one of my favorite paper lines of all times, the A Muse petite gingham.  There's a great little stamp shop nearby that carries A Muse, so I went stock up on every color of this paper the other day.  I want to wallpaper my house with this stuff.  :)  Not sure how excited my husband would be to find our bathroom covered in pink gingham, though. 


The sun is made from Spellbinders Nestabilities.  The hills stamp is from the Wonderfully Whimsical set from PTI.  The tree is Unity and the sentiment is A Muse.  I also used a Martha Stewart punch for the scalloped hills.

This is another one of those cards that I'm looking at sideways and every which way to figure what just doesn't seem right...any ideas?  It's missing something but I can't place it.  Hmmm.

Saturday, April 10, 2010

Third post...I'm on a roll :)

Starting to get the hang of this whole blog thing...and I like it!

Today, I'm posting 2 cards I made from a design I've seen so many times. It's so easy, or so I thought. Straight lines with a pen. No problem. Then just adhere some punched out something or others. Voila. Well, the first time I tried this, it took me an embarassingly long time. Lots of math and measuring to make sure the drawn lines were perfectly centered.


Then it dawned on me.   Duh, a centering ruler!  Hello?  (Um, did I just sound as nerdy as I think I did?) Anyway, so THAT'S the secret to making these super simple cards so simple!  OK, got it now.  I accidentally hit the ruler with my hand on the second one, so the lines aren't perfect, but it's centered.  Without any math. 


I think this will become one of my favorite "mass produce" designs. 

Thanks for looking...check back to see what other aha moments I have when my common sense decides to make an appearance. 

Lauren


Thursday, April 8, 2010

Personal Challenge: Day Two

So, this is my second day blogging and I am getting really excited about it. I think this is just what I needed to get my creativity flowing a bit more.

Today I took on Prisma pencils and odorless mineral spirits. In an attempt (albeit probably temporary) to find a less expensive alternative to Copics, I decided to invest in some Prismas. Being the completist (is that a word?) that I am, of course I opted for the Mack Daddy 132 set of pencils. It's really quite impressive and intimidating to look at all these pencils in the box. Anyway, I've seen a few tutorials online and decided to give it a go.

I started slow and simple. Can't get much simpler than this.


The stamp is a $1 stamp from Michael's. Cute, right? The cardstock is Papertrey (white and summer sunrise) and the patterned paper is A Muse yellow gingham. I need to find a better spot to take my photos because the colors look much darker than they are in person. I promise, that's Summer Sunrise.

Then, feeling pretty good about myself, I took on something a bit more challenging. I have quite a way to go when it comes to shading properly, but here's my attempt at taking my coloring to the next level.


The main image is Stampingbella and the sentiment is Close To My Heart. The cardstock is Papertrey (Spring Moss, Summer Sunrise and White). The tag is spellbinders, the ink is Memento, the ribbon is American Crafts. And of course, the pencils are Prismacolor. It's a little hard to tell in the pic, but I added some bling to the sun and the orange dots on the tree.

Now if only I could get those Copics out of my mind. They are SO pretty! (sigh.)

Wednesday, April 7, 2010

My Personal Challenge: Day One

Well, the day I never thought would come has finally arrived. I have a blog. I have a BLOG! Saying that just made me giggle at myself. Who am I to have a blog??

Anyway, the reason I decided to take the leap into blog-dom was to challenge myself. Challenge myself to work harder at developing my crafting skills. Challenge myself to learn new techniques. Challenge myself to learn design principles so I can stop looking at my projects sideways and saying "Something's just not right." Challenge myself to use my supplies instead of hoarding them. Not sure how well I'll do on that last one.

I welcome you to join me on my journey of learning how to be a decent papercrafter. I'd love to hear what you think!! Just please be gentle. :)

Day One: In the spirit of challenging myself, I decided to break open my first package of alcohol inks. The result is the card below. I punched the center scallop square out of acetate and applied alcohol ink to the back. I stamped "thanks" and a leaf stem with Archival Ink on the front of the acetate. The turquoise cardstock is Papertrey Ink in Hawaiian Shores. The alcohol ink is Ranger in Stream. I should have used a little more blending solution to lighten the ink a bit more, but otherwise it's a decent match.


I added a little red bling and black ribbon, then used pop dots to raise the matted scallop square. The sentiment stamp, scallop border die and patterned paper are also by Papertrey Ink. The leaf is American Crafts. Scallop punches are Marvy pink and purple.

I'm still looking at it sideways thinking "Something's just not right", but at least I'm on the road to learning and improving. A road that is always paved with mistakes and do-overs. And lots of fun....

I'd love to hear what you think.